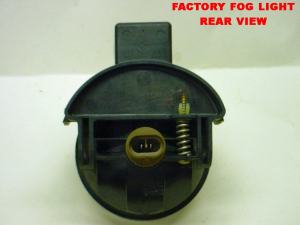
STEP
1 -- Remove the factory fog light assembly.
| a) |
There are two bolts holding
it in. The easiest way I found to get to them is to open the hood
and go in right behind the headlight. You can barely see the bolts,
but you can get a small ratchet in there to get them out (they are 10mm
bolts). There are three bolts in the vicinity, but one of them appears
to hold the bumper bracket. Make sure you get the correct two. |
| b) |
Once the bolts are out,
go back underneath and grab the shroud from the bottom of the vehicle. Twist it
about ¼ turn. Twist the top of the shroud toward the center
of the vehicle (the left side clockwise when viewed from the rear, and
the right side counter clockwise) and it will drop right out. |
|
| STEP
2 --
Remove the adjusting screw
and spring from the rear of the assembly. Also remove the white nylon lock nut by squeezing the
"Legs" together and pushing it out. Then you can put the screw, spring,
and lock nut together to keep from losing them :-) |
 |
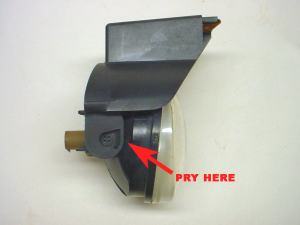
| STEP
3 --
The lamp assembly has a pin
molded on the side and the shroud has a large "Ear" with a hole in it that the pin fits into. Insert
a screwdriver at the position shown and carefully pry outward and the pin will pop out of the hole. The lamp
assembly can then be twisted out of the shroud. |
 |
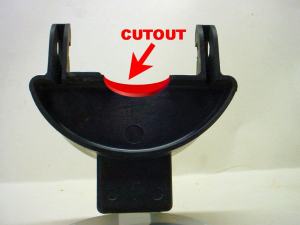
| STEP
4 --
This photo shows the shroud
from the rear, and upside down. The square section in the bottom
of the photo is actually the top of the shroud. Use a Dremel tool
or a file to make a notch in the flange of the shroud. This will
allow some clearance for the back of the Angel Eye so you can adjust the
light up and down. The size of the notch doesn't really matter as long as it is wide enough for the
lamp base on the Angel Eye.
I made mine about 1/8" deep and in a crescent shape about 1¼" wide as shown in the photo. |
 |
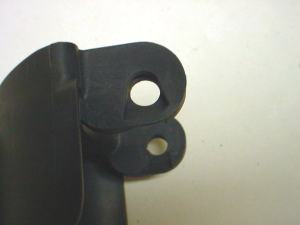
| STEP
5 --
The two "Ears" that the pins
of the lamp assembly fit into are in two layers. This photo doesn't
show that very well, and you can actually see it a bit better in the photo
for Step 4. The OUTSIDE layer needs to be opened up somewhat so that
the bolt used to mount the Angel Eye bracket will sit flat against the
inside part of the "Ear". |
 |
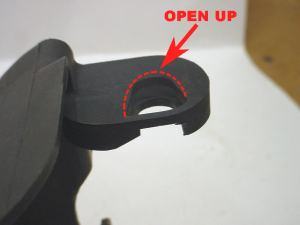
| STEP
5 -- Continued
This photo shows the area
that needs to be ground out, but be sure to only open up the OUTSIDE layer,
don't cut all the way through both layers! |
 |
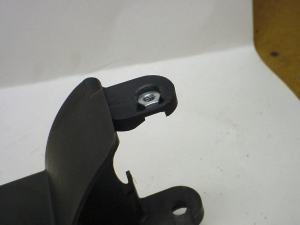
| STEP
6 --
When you are done the nut
for your bracket bolt (or bolt head depending on how you do it!) will sit
flat inside the hole as shown in this photo. |
 |
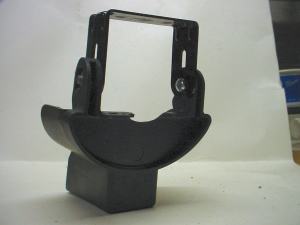
| STEP
7 --
Almost there! Now use
two bolts and bolt the Angel Eye bracket to the shroud using the slots
in the side of the Angel Eye bracket and the holes in the "Ears" of the
light shroud. I used LockTite on the nuts to keep them from vibrating loose.
Push the bracket as far down as you can so that the bolts are at the ends of the slots.
The photo shows what it will look like when you are done. |
 |
| STEP
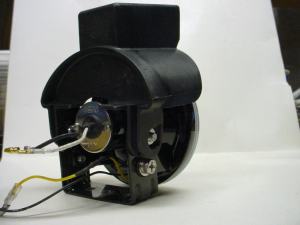
8 --
Install the Angel Eye in
the bracket using the normal side slots. The top of the Angel Eye light will actually be at the
bottom of the fixture. The photo shows what it looks like when it is complete.
One person has expressed concern about whether or not having the lamp upside down will cause drainage
problems. I have not had any problems in that respect yet, however they have only been installed
for a few weeks. |
 |
| STEP
9 --
Now just reverse Step 1 to
install the fixture. Slide it up under the bumper, and put the Angel
Eye into the hole for the factory fog light. Twist the top of the
assembly toward the center of the vehicle and it will pop into place so
you can bolt it down. (Read Step 11-f before you go to a lot of trouble bolting things back down!) |
|
STEP 10 --
Notice! Some Durango owners have reported that their headlight switch
assembly gets quite hot when the fog lights and headlights are on. Dimming the dash lights can make this problem
even worse. If yours is one of these you probably do NOT want to install your Angeleyes this way because that will
make that problem worse and may cause failure of your headlight switch assembly or high / low beam switch assembly.
The Angeleyes will draw about 9.25 amps of current as opposed to the approximately 6.2 amps of the factory fog lights.
Take a look at section 10a below if your Durango falls into this category.
The electrical hookup for the driving lights is pretty straightforward. The Angel Eye is in two distinct electrical sections, the "Lamp"
(which is the actual driving light) and the "Ring" (which contains the blue LED's). When wiring it up be sure to keep the sections isolated. Normally tying all ground (black) wires
to a chassis ground is perfectly fine, but I think Dodge may be doing something strange with the lighting circuit so keep the ground of the two sections isolated by wiring the "Lamp"
grounds back through the factory wiring harness.
I cut the original plug off a couple of inches from the plug (so I can put it back when I sell the truck!) and soldered connectors on the wires to mate with those on the Angel
Eyes. Using crimp connectors would be easier, but I prefer soldered connections. On my truck the two wires were the same color, but one had a black tracer on
it. The wire with the black tracer is the negative (ground) wire and connects to the
black wire of the Angel Eye driving light section. The other wire is the positive wire and connects to the white
wire of the Angel Eye. (Note that since this is just a DC lamp it doesn't really matter which way the current flows, but it's always better to keep it going the way the factory
intended so keep hot to hot and ground to ground)
|
|
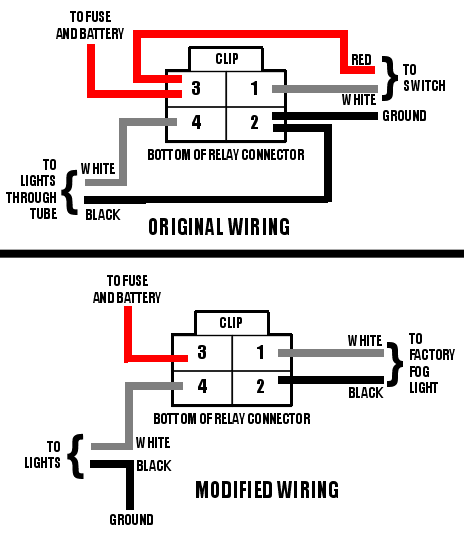
STEP 10a -- Alternate Wiring
NOTE: I have NOT tried this wiring method, however
electrically it should work properly. USE THIS SECTION AT YOUR OWN RISK!
I do not like the way Dodge designed the lighting circuits. The design
causes ALL of the current from the fog lights to flow through the headlight and high beam / low beam switches when it is
returning to ground. This could lead to premature failure of either of those switches, regardless of whether you are
using Angeleyes or the factory fog lights. I have not had any problems with mine but that does not mean that you will
not, nor does it mean that I won't have a problem in the future! A better way to connect them electrically would be to
use the relay and fuse provided by Optilux with the Angeleyes. Refer to the image below. It shows the relay
connector in the Optilux harness as viewed from the bottom with the clip on top.
Notice that the top right cavity in the relay connector has a single white wire; the bottom right cavity has two black
wires; the bottom left cavity has a single white wire, and the top left cavity has two red wires. The two cavities
on the right are the relay coil and the two cavities on the left are the relay contactor. We are going to wire it
so that the coil goes to one of the factory fog lights and the contactor controls the new Angeleyes.
|
 |
| a) |
The Optilux harness provided is in two parts; one part has a white plastic connector and three wires (red, white, and yellow)
in it. This part will not be used. The other part has several of the wires running through a piece of black
tubing. This is the section you want to work with.
|
| b) |
Find the relay connector. It is a black plastic connector with four cavities in it. Referring to the image
above, note that there are two black wires running into cavity 2; one terminates in a ring terminal and the other goes
through the black tube to the Angeleyes. Cut the side that goes into the black tube, and insulate the piece that
is left coming out of the relay connector so that it will not short to ground. Cut the ring terminal off of the
other black wire and splice it onto the black wire that goes through the tube.
|
| c) |
There are two red wires going into cavity 3 of the relay connector. One goes to a fuse and the other goes to a white
plastic connector that would be connected to the switch. Cut the wire that goes to the switch connector, and insulate
the piece that is left coming out of the relay connector so that it will not short to ground.
|
| d) |
Route the black tube along the bottom of the fascia under your grille, and connect the BLACK wire from the driving light section
(NOT the ring section!) to the connector provided. Likewise connect the WHITE wire to the connector provided. Do this
on both sides so that both lights are wired into the harness.
|
| e) |
In step 10 above you found a wire from the factory fog lamps that has positive voltage on it. Connect the white
wire coming from cavity 1 of the relay (refer to the image above) to this wire. you can either cut the factory
connector off or use a "Quick Tap" to do this since it will be a low-current connection.
|
| f) |
Connect the single black wire in cavity 2 of the relay connector to the other factory fog lamp wire. You can either
cut the factory connector off or use a "Quick Tap" to do this since it will be a low-current connection.
|
| g) |
Connect the red wire that goes to cavity 3 of the relay connector to the battery. It is best to go directly to the
battery as opposed to a switched 12v circuit so that the current draw of the lights will be directly from the battery.
The relay that is wired into the factory fog lamp circuit actually controls the lights, so it will provide the same audible
warning you get when you leave the headlights on.
|
| h) |
Connect the black wire coming back through the tube (you spliced the ring terminal onto it in step "b" above) to a
suitable chassis ground. Be careful to find a true chassis ground since much of the material around the bumper
facia is fiberglass or plastic.
|
| i) |
Plug the relay into the connector.
|
|
Remember that I have NOT tried this wiring method. I wired mine
through the factory switch, however electrically it should work properly. I plan to rewire my lights using this
method at some point just because it is a better way to do it, however I have not done so yet! USE THIS SECTION
AT YOUR OWN RISK!
|
|
| STEP
11 -- |
|
The electrical hookup for the rings is also pretty
straightforward, but getting to the parking light wires is not that easy.
|
| a) |
Remove the lens for the
front parking light. There is one small screw between the clear and amber parking light lenses.
Remove that screw and the entire lens assembly will slide forward. |
| b) |
Unplug the connector to the parking light you just pulled out (you have to push in on a small clip on each side of the
connector to get it to release). |
| c) |
Turn on your parking lights and use a volt meter to
find out which wire shows approximately 12 volts when the parking lights are on and zero volts
when the parking lights are off. Note that on my truck the hot wire
was the center of the three wires in the connector, so you might want to test that one first. Also note that if you can get to the side lights there are only
two wires to deal with, and one of them is solid black so it is the ground. Getting to the parking light was easier for me to do. |
| d) |
Use a crimp-on splice to run a wire from this wire
to the yellow wire of the ring on the Angel Eye. |
| f) |
Run a ground wire from the chassis (I used the bolt that holds the light shroud to the chassis) to
the black wire of the Angel Eye ring. |
| Note 1) |
Polarity is important here since these are LED's (the "D" stands for "Diode" which is like a one-way
valve for electricity) and not incandescent lamps. Be sure the "Hot" side goes to the yellow wire and the black wire is grounded. |
| Note 2) |
I can't think of a reason why you would, but if for some reason you need to shorten the yellow wire on
the LED ring, do not shorten it too much. There is a resistor in that wire (you can feel it under the heat shrink tube in the wire)
that needs to stay there. |
| That should take care of it and the rings will light when your parking lights are on. |
|
|
STEP 12 --
If something doesn't work for you, or you have something to add, please feel free to drop me a note and I'll add it to the
instructions. There is an email button below, and I'd appreciate hearing how things worked for you. |
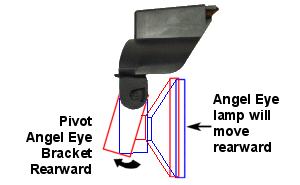
| HINT --
I found out by experience that if the lamp assembly hits the edge of the hole in the bumper that the vibrations of the
bumper will knock it out of adjustment. You can help eliminate this by moving the lamp straight back. The way that the bracket hangs down and is hinged at
the top (where the original pin in the shroud was) and the bottom (where the Angel Eye) bolts on, you effectively have a "Linkage". You can pivot the Angel Eye
bracket backwards and this will move the lamp assembly backwards (you will need to pivot the lamp upwards, of course). I tried to draw an image of it, but it
isn't very good. Maybe it will make some sense though. |
 |