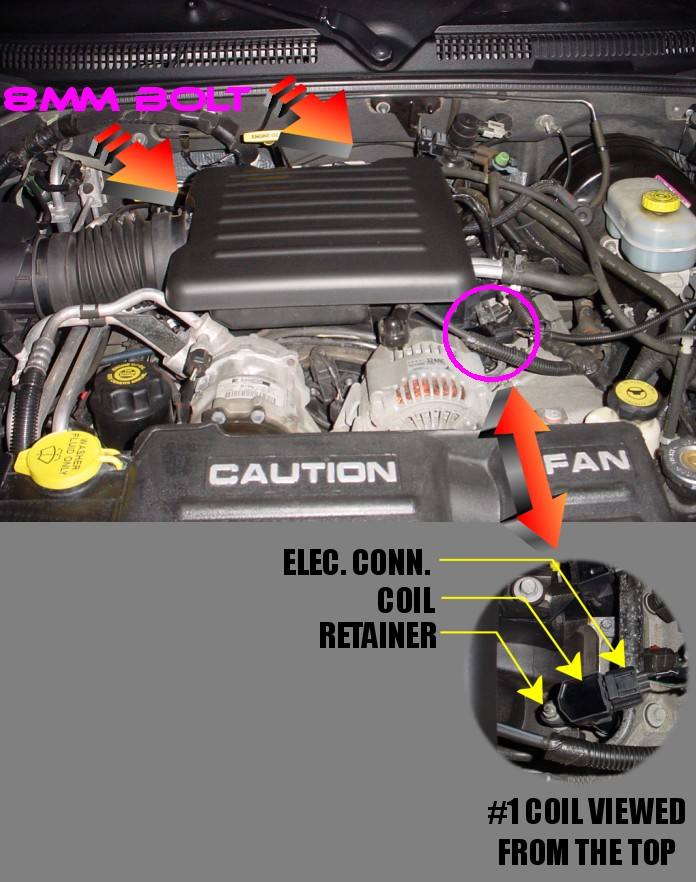
Changing spark plugs on the 4.7 liter engine is relatively straightforward, and in some ways much easier than other engines. The plugs are vertically oriented which makes them a lot easier to get to. This engine is unique in that it has a coil on each spark plug. The coils slip over the spark plug and have a retainer that goes over a stud on the head. The coil must be removed to gain access to the plug. The image below shows a closeup of the coil of the #1 cylinder.
The Factory Service Manual states that you should ONLY use spark plugs with a copper electrode and with the same number and heat range as the OEM plugs or detonation will occur. The factory spark plugs are Champion RC12MCC4. All plugs should be gapped to 0.040"
- Remove the air hat from the throttle body (8mm bolts on the hose clamps between the air hat and air box, another one on the hose clamp around the throttle body).
- EACH plug has a coil on it. Use a compressor or a can of air to blow all the debris from around the coil.
- Unclip the electrical connector by pressing down on the clip on top of the connector and then pulling the connector off.
- Use a 10mm socket to remove the bolt that holds the coil to the block (CAUTION! Don't drop the nut or you may never see it again!)
- Twist the coil slightly while pulling up and remove it from the plug. There is an O-ring around the coil. Make sure it is not damaged. If it
is nicked or torn replace it. The Mopar part number for the 2000 4.7L engine ignition coil O-ring is 05015297AA and the cost (on 12/03) is about $3.30 each.
- Use a compressor or a can of air to blow all the debris from around the plug. They are deeply recessed into the head and vertically aligned. Anything in the recess is going to fall down into the cylinder when you pull the plug!
- Use a standard 5/8" spark plug socket (I highly recommend that you use one with a foam insert that holds the plug!) to remove the plug.
- Install the new plug and torgue to 20 ft lb. BE VERY CAREFUL when starting the plug and make SURE it does not cross-thread. The plug recesses make it a little hard to mess up, but be careful anyway. The heads are aluminum so do not over-tighten the plugs!
- If you have some, spread a little silicone grease on the coil O-ring. Reinstall the coil, and the coil retainer nut. Reinstall the coil electrical connector.
- Repeat steps 2 - 9 seven more times.
- Reinstall the air hat and reconnect the tube to the air box.
The number 8 cylinder is the tough one for me. The dip stick tube for the transmission gets in the way of removing the coil and the plug itself is tucked back under the firewall slightly. You'll need a swivel for that one.
Cylinders 3 and 4 are also slightly tough. There are some metallic hoses going across the block (A/C or something, I never really looked). You will need to unclip the retainers that hold them down, and then spread the hoses a bit to be able to get the coil between them.