|
"What airbrush is the best?" or "What airbrush do I need?" or "Why can't I get fine lines from my airbrush?" or "I want
a new airbrush to be able to ____." These are all variations of the same question and they are all virtually impossible to
answer simply other than with this statement: An airbrush is a tool, no more, no less. While good-quality tools are
critical to any project, the results achieved, as with any tool, are dependant on the abilities of the person holding the
tool. Put an inexpensive airbrush in the hands of an experienced airbrush artist and you will get professional
results. Put the best airbrush made in the hands of someone who has never held one and the results will be
disappointing to say the least.
An airbrush will not make a normal person into an instant artist. It doesn't work that way. As stated above, an airbrush is just a tool and if your expectations are to instantly start producing professional-quality paint jobs you are most likely going to be disappointed. Did you pick up your first pencil and immediately start doing elegant pencil drawings? Not likely. Just like any other talent, using an airbrush properly and getting good results from it is something that must be achieved through practice. If you aren't willing to practice and learn to use your tools properly then don't be surprised when the results are less than you had expected. For most of us it takes many long hours to become proficient with an airbrush. Learning how to mix your paint, how to adjust the pressure, how to hold your hand, how to adjust your lights, how to adjust your subject, these are all necessary learning experiences and they do not happen overnight. If this is not something you are willing to do then you would be better off staying with brushes or spray cans. You need to decide if this is for you or not. Still here? Good! That means there is still hope for you. Note that the focus of this document will be on airbrushes as they pertain to scale modeling. The use of the word "Paint" is somewhat incorrect because an airbrush can also spray ink or other media. Let's get started by looking at the different types of airbrushes because there are several different types and combinations of those types. Each is suited to a particular type of use.
A C T I O N Airbrushes are categorized as being either "Single-Action" or "Double-Action". Both have only one trigger, but the trigger operates differently. In a single-action airbrush the trigger only controls the airflow. Push the trigger down and air passes through the airbrush to atomize the paint. Let go of the trigger and airflow stops. The volume of paint is controlled by adjusting the depth that the needle travels into the nozzle. This is normally accomplished by a screw adjustment on the airbrush, frequently at the rear. In a double-action airbrush the trigger controls both the airflow and the paint volume. Push the trigger down and air passes through the airbrush, just like a single-action brush. Pull the trigger backwards and this allows paint to begin to flow. The farther back the trigger is pulled the more paint is delivered to the airflow. In this way the double-action airbrush is able to provide constantly varying amounts of paint. You do not have to stop, adjust the paint flow, then start spraying again. In general, a double-action airbrush is much more flexible to use than a single-action airbrush. When building scale models, the ability to adjust the paint volume "On The Fly" is of great value. This is not to say that a double-action airbrush is critical for building models. There are many people who use single-action airbrushes extremely well and could put most of us to shame. It goes back to the concept that an airbrush is just a tool and what works best for one person is not automatically the best choice for everyone. Double-action brushes take a little more time to get used to because your hand has to do two things at once. This is a minor inconvenience that most people overcome very quickly though.
F E E D
Airbrushes require both air and paint to work. Air is simple; hook the airbrush to an
air source, and the pressure does the rest. The feeding of the paint is different because it is not under any
outside pressure. Two types of feeding are generally used for airbrushes; "Gravity" feed and "Siphon" feed.
Gravity fed airbrushes typically have a paint cup on either the top or side of the airbrush. Paint is poured into
the cup and gravity pulls a minute amount down into the mixing chamber of the airbrush where it is atomized and sprayed.
Siphon fed airbrush, also called "Bottom Feed" airbrushes work on the principle of a siphon. A bottle, or other
container, is connected to the bottom of the airbrush and a tube runs from the airbrush down into the bottle. As
air is blown across the top of the tube paint is pulled up into the mixing chamber where it is atomized and sprayed.
There are also some "Hybrid" airbrushes that are a combination of the two. The Badger 360, for example, has a
section that can be rotated so that it can use either a paint cup on top or a bottle on the bottom. There are
also paint cups available for siphon feed airbrushes that raise the paint level up above the mixing chamber of the
airbrush. If the paint level is higher than the mixing chamber, gravity will assist the feeding.
The advantage of a gravity feed airbrush is that it will feed at lower air pressure than a siphon feed brush. The
air pressure does not have to pull the paint up from the bottle below, so they are capable of spraying at lower
pressures. This is important when painting fine-line camouflage on model airplanes since lower pressure usually
means less overspray to deal with.
The advantage of a siphon feed airbrush is usually quantity. The bottles used on them can hold a lot more paint
than most paint cups. While this is usually not that critical on scale models, it is important when painting large
objects. It is a nuisance to have to stop every couple of minutes, refill your paint cup, and then try to pick up
where you left off.
It is often argued that a gravity feed airbrush is easier to clean than a siphon feed brush. I tend to disagree
with this statement simply because the cleaning operation for either type is pretty much the same. Put some thinner
in the cup or bottle, and blow it through the airbrush. In most cases that is all that is required. I
have both types, and unless I completely disassemble them for cleaning (which I do from time to time) it takes about
a minute to clean either one. When I do completely disassemble them for cleaning my siphon feed brush has one
more part to clean than my gravity feed brush, that being the bottle cap assembly itself. OK, maybe a gravity
feed brush *IS* slightly easier to clean, but we are only talking a few seconds.
Gravity feed airbrushes have a paint cup that holds the paint. This bears some consideration when you are
choosing the one that you want. In most cases the cup is on the top of the airbrush, but in some cases it is on
the side. The cups themselves are normally fixed to the airbrush and are not interchangeable in most cases,
however they do come in varying sizes. If you build large models an airbrush with a tiny paint cup will cause
you to have to stop frequently to refill the paint cup. Likewise, if you build small models a large paint cup
is probably just going to be in your way. One of the things that bothered me when I first started using a
gravity feed brush is that the paint cup always seemed to cast a shadow right where I was painting.
For some siphon feed airbrushes you can purchase a paint cup. They usually sit to the side of the airbrush
but since they sit higher than a bottle, and the paint is usually up around the center of the airbrush, they do
allow you to spray at a slightly lower pressure ("Slightly" being the keyword).
Another thing to consider is whether or not the paint cup has a cap on it. People who spray acrylics know
how quickly they dry. If the paint cup is open to the air the paint can start to dry in the cup. Having
a cap on the paint cup helps eliminate this problem to some extent.
Airbrushes are also categorized as being either "Internal" or "External" mix airbrushes.
Internal mix airbrushes atomize the paint inside the body of the airbrush. Paint from the cup or bottle flows
directly into the body of the airbrush where it is introduced into the airflow. External mix airbrushes typically
have the paint nozzle located below the airbrush body. The Paasche H model is an example of an external mix
airbrush. Air flowing over the paint nozzle pulls paint into the airstream where it is atomized outside the
airbrush. There is normally no paint inside the actual body of the airbrush itself.
Internal mix airbrushes typically produce a finer and smoother finish than external mix airbrushes. For this
reason, especially when painting models, an internal mix airbrush is usually the tool of choice.
Most airbrushes have nozzles and needles that can be changed for different purposes, and
most people are under the impression that a smaller nozzle / needle combination automatically means a finer line.
Not always true. Admittedly, a huge gaping hole at the end of your airbrush will never give a fine line, but what
controls the line width is the geometrical relationship of the needle and the nozzle.
Think of your common garden hose nozzle. Most of them can be adjusted to give a wide mist spray or a narrow spray
by simply turning them or squeezing a trigger. This is accomplished by changing the geometry between the hole in
the end of the nozzle and the needle within the nozzle. Water, or paint in the case of an airbrush, flows over
the needle and out of the nozzle. A long, tapered needle allows the paint to hit the end of the nozzle at a very
shallow angle so that it will exit in a narrow cone. A sharply-shouldered needle will cause the paint to exit the
nozzle at a much wider angle. The difference, obviously, is a trade off between a narrow line and being able to
cover large areas.
Keep in mind that, just like your garden hose, paint exits an airbrush in the shape of a cone. An inch in front
of your garden hose the spray pattern is probably only an inch wide. Ten feet from the end of the hose it is
several feet in diameter. An airbrush is the same. Right at the nozzle, the spray pattern is only slightly
wider than the nozzle itself (wider because of the different air pressures causing a slight vacuum right at the tip
and causing the paint stream to spread out), but several inches away from the nozzle it will be much wider.
The closer you can get the nozzle of your airbrush to the surface, the finer the main body of a line will be.
This is, of course, affected largely by the air pressure. Put the nozzle right against the surface and paint
will splatter everywhere so you have to get back far enough to prevent splatters. But that means you start
getting into overspray which also causes the line to widen out. Fine lines are always a balancing act between
paint viscosity (thickness), air pressure, needle / nozzle, and the user's abilities.
You can also run into problems using ultra-fine needles and nozzles when using paints and other high-viscosity
media. Ultra-fine nozzles are usually designed for ink which has a much smaller particle size than paint.
In many cases using a very fine nozzle will do nothing but cause feeding problems because the paint is just to thick
for the nozzle. It's a lot like trying to pour molasses through a salt shaker, it just isn't going to happen.
Rather than add a section here pertaining to problems and their
solutions, I generated a separate page for it since there are quite a few things to cover. Click This Link
for the troubleshooting page.
When deciding on what airbrush is right for you, here are a few things to consider:
It is also important to keep in mind that airbrushing skills are easy to lose. If you don't paint for a month
or year don't be surprised when you see that your skills have degraded. Like many other acquired skills,
control of your airbrush degrades if it isn't used. Practice on some scrap and they will come back in short
order though.
You are going to need an air source to provide air for your airbrush. This can be in the form of a compressor
or tank / can. For modeling purposes you will not need a lot of pressure nor a lot of volume, but the air does
need to be dry and provided at a consistant pressure and volume. There are four generally accepted source of air:
One important thing to remember is that it does not matter how physically big the compressor is or how much pressure
it produces. You can purchase a compressor with a 2 gallon tank or a 20 gallon tank. You can purchase one
that provides 90 psi (pounds per square inch) of pressure or one that provides 200 psi. For use with your airbrush
it does not matter. The compressor will have a regulator to allow you to adjust the pressure down to what you
need for your airbrush. A larger tank with higher pressure just means that the compressor motor will come on
less often than a compressor with a smaller tank.
The down side to this type of compressor is that they are frequently loud. If you live in an apartment or
do not have a place to put a compressor that will not bother other family members this may not be the choice for
you. That is a choice that you will have to make.
One thing to watch out for with some of the less expensive hobby compressors is that they frequently have a
pulsation to the air flow. This is common in diaphragm-type compressors that do not have a tank to accumulate
air and smooth out the pulses.
In most cases you will need a regulator. A regulator is used to adjust the pressure of the air, and most
good compressors will come with one installed. Smaller compressors may not need one because their output
air pressure is so low. For modeling use you will normally want to paint at 30 psi or lower. I
seldom paint above 20 psi, and most of my painting is done at pressure much lower than that. I have
written a page pertaining to air pressure, and it is available at This Link
If your compressor did not come with a regulator you may need to add one.
In most cases you will also need to add a moisture trap. Tanks of carbon dioxide or nitrogen do not need a
moisture trap because those gases are completely dry. Compressors nearly always do need a moisture trap.
When air is compressed the moisture in it is squeezed out. This moisture is picked up and blown down the hose
when the air escapes. It will frequently blow out of the airbrush and can ruin a paint job before you know
what happened. A moisture trap will capture the moisture before it can be blown out of the airbrush, and is
cheap insurance against ruining a paint job that you put a lot of time and effort into. The trap should be
located as close to your airbrush as is conveniently possible. This gives it a better chance of picking up
moisture that manages to condense and travel down the hose.
P R O T E C T Y O U R S E L F
In my opinion no discussion on airbrushing would be complete without a warning to protect
yourself. The thinners and solvents used in paints are not meant to be breathed into your body. In many
cases they are toxic and even the materials that are not explicitly toxic were never meant to be breathed. We
use Future Floor Polish a lot in our models, but it is a FLOOR POLISH and was never meant to coat the inside of
our lungs. Acrylic paints may not contain toxic solvents but a coat of acrylic plastic on the inside of our
lungs is not going to do a thing for our ability to breathe! Protect yourself! Use a respirator or
spray booth when painting. A good respirator with organic vapor canisters will remove the vapors and
particles before they get into your lungs (note that a paper filter mask is **NOT** sufficient protection
from paint vapor) and a spray booth will evacuate the vapors from the area. Nobody can force you to do this
but if you don't, who will? At the risk of sounding trite, you only have one pair of lungs and living
without them is difficult to do.
These are the most common airbrushes available in the USA. This list is by no means a complete list of airbrush
manufacturers, but they are the most common airbrushes available here. In my opinion, and I emphasize
that this is my own personal opinion, if you buy a double-action, internal mix airbrush made by Badger / T&C,
Iwata, or Paasche that is suited to what you are going to paint you will never be sorry. The last phrase
is important because all of these manufacturers have models that are not well suited for painting models.
An airbrush is designed for a specific medium such as paint or ink. Airbrushes designed for ink may not
spray paint well and airbrushes designed for paint may not spray ink well.
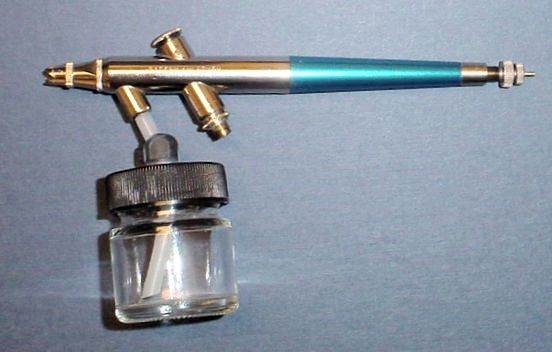
Badger also manufactures Thayer and Chandler airbrushes now. In addition to my Badger 200 (single action,
siphon feed) I have a T&C Omni 3000 (double action, siphon feed) and a T&C Omni 4000 (double action, gravity feed).
For modeling purposes, the Omni 4000 is an excellent airbrush and does everything I need.
One thing about some Paasche models is that the handle is somewhat thicker than either Badger or Iwata.
Depending on your personal preference this can be either a good thing or a bad thing, and that is something that
you will have to decide for yourself. I was told that this is the case on the Paasche VL and H models but
not on the V, VJR and VSR models.
Their style is completely different from most other airbrushes, and instead of holding the airbrush like a pencil
the Azteks are held more like a gun. Some people prefer this style, others do not. It is a personal
preference that you will have to decide for yourself.
I will, however, repeat what I have been told many times over: that they are unreliable. One day they
will be working properly, the next they will be spitting and sputtering. I think (emphasis on "Think")
that this is because of improper cleaning of the removable tips. Reportedly they are supposed to require
very little cleaning, but in reality everyone who uses them tells me that the tips absolutely MUST be soaked
in thinner overnight to prevent clogging.
I would also like to add that there are a number of people whose abilities I respect very much that have had
excellent results with Aztek airbrushes. I think it all goes back to knowing and understanding your tools
and being able to maintain them in the manner that they require.
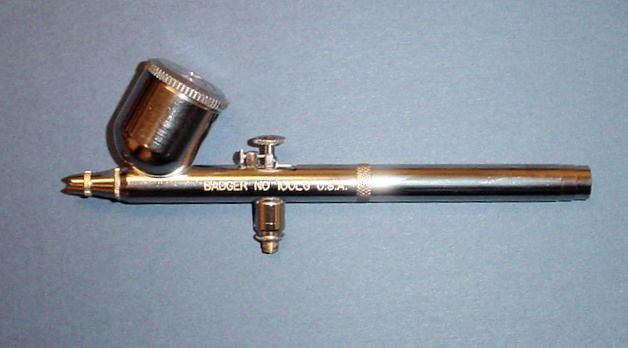 This is a Badger 100LG airbrush. It is a double action, gravity feed brush. Notice the differences between it and the Badger 200 above. Whereas the 200 has a bottle on the bottom the 100LG has a paint cup on top. Also note that the cup is angled so that when you are spraying with the airbrush pointed downward paint will still flow into the paint cavity in the brush. Also take note that there is no needle adjustment screw at the rear of the airbrush. Since this is a double action brush, air is triggered by pushing DOWN on the trigger and paint flow is controlled by pulling back on the trigger. If you look closely you may also note that the head assembly of the 200 and 100LG are exactly the same. Both the 100 and 200 have three heads / needles available; Fine, Medium, and Large. The Fine head, while able to spray slightly finer lines, was designed for fine-pigment mediums such as ink. Many people have problems getting model-type paints to flow through the fine head because of the pigment size, however I have not had any problems in that regard. The 100LG is new and has not been used yet, however I have had a fine head installed on my 200 for a long time now and have not had any problems with it clogging. I do generally just use that airbrush for general coverage type jobs at relatively high pressure (around 20 psi) though, and if I tried to paint something at low pressure I might experience problems with the fine tip. 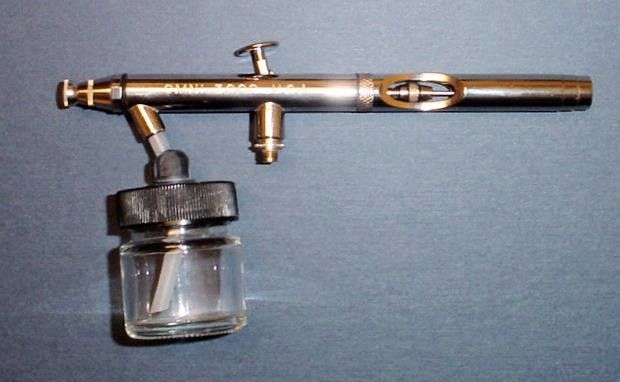 This is a Thayer and Chandler Omni 3000 airbrush. It is a siphon feed, double action airbrush. Thayer and Chandler are now manufactured by Badger, so this is effectively another Badger product. Similar to the Badger 200 above it uses a paint bottle on the bottom of the brush (in fact this is the same bottle assembly as is shown in the Badger 200 photograph), however unlike the 200 it is a double action brush. This was my first double action airbrush, and after I started using one I have found it difficult to go back to a single action brush for delicate work. The Omni series uses a single nozzle and needle combination. There are no Fine, Medium or Large nozzles available, only the one that comes on the brush. 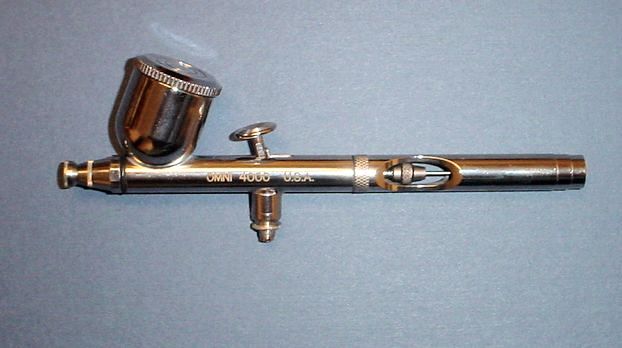 This is a Thayer and Chandler Omni 4000 airbrush. It is a gravity feed, double action airbrush. This is my main "Workhorse" airbrush and it is used for everything from general coverage to camouflage. As an all around airbrush it is hard to beat in my opinion.
A I R B R U S H H I S T O R Y
Just a little touch of the history of airbrushes to give you an idea of
how long they have actually been around ....
The first airbrush, named a "Paint Distributor", was invented by Mr. Abner Peeler of Webster City,
Iowa in 1879. In 1881 Liberty & Charles Walkup of Rockford, Illinois buy the rights to Peeler's
airbrush patent, and in 1883 the Walkups form "The Rockford Manufacturing Co." to produce the new
"Air Brush." The name is subsequently changed to "The Airbrush Manufacturing Company".
Here Is A Link to photographs of
early airbrushes, starting out with the 1885 Walkup airbrush at the top.
Here Is Another Link to a great airbrush history
site that is presented by Andy Penaluna. It is very well done and depicts the history of the airbrush
with many photographs and drawings as well as a QuickTime movie of a restored 1885 Walkup airbrush in
use. A highly recommended site, well worth visiting.
Here Is A Link to a complete
timeline from 1879 to 2004 that shows the development of the airbrush as we know it today. This
information was gathered from The Airbrush Museum web site
and anyone who is interested in airbrushes should take some time to visit this web site. This
site is full of interesting information about the development of the airbrush, as well as lots of
photographs of many early airbrushes.
"But this still didn't answer the question of what is the best airbrush
for me!" You are absolutely right, it didn't. And that is because, as stated at the very top of this
document, there is no simple answer to that question. An airbrush is a tool, no more, no less, and the best
airbrush for you is the one that you prefer. Some people prefer Iwata over Badger, others prefer Badger over
Iwata. This does not necessarily mean that one is better than the other, only that a particular person prefers
a particular airbrush. The one that is right for you is the one that you are comfortable with.
Results from an airbrush are all that matter. If you have an airbrush that is doing exactly what you want,
that is giving you the results that you are after, and is behaving the way you want, then you already have the
right airbrush for you. Buying another airbrush is not going to improve things because you already have the
results you are trying to attain. Take the money you were planning to spend on a new airbrush, get some paint
and sheet styrene, and practice.
If you are not getting the results that you want then you need to decide what area is not working. Does your
airbrush constantly clog up at the tip? Are your spray jobs grainy and rough? Are you unable to get the fine
lines that you desire? Decide what the deficient areas are and then insure that it actually is the airbrush causing
the problem. It may be something as simple as Improperly Thinned Paint
All of those things mentioned can be caused by factors other than the airbrush itself. You might go out and
buy a new airbrush only to have exactly the same problems with it. Before you blame your tools, be sure that
the tool is at fault.
This is an open document. While the opinions are mine alone, I am always open for input from others. I do
not pretend to be an expert with an airbrush, nor do I pretend to have all the answers. If you disagree with
something that is written here, or if you just have something to add, feel free to drop me an email.
A link to this information was placed on
Fine Scale Modeler's Forum along with a request for input, so the members of that forum deserve a lot
of credit for their input and assistance. As far as that goes, they deserve credit for virtually everything
I know about airbrushing since so many of them were willing to answer my own questions.
Scott Craig -- March, 2005
This document is available as a PDF file that you can download and print. You can download the file from This Link. You will need Adobe Acrobat reader to view the file. It can be downloaded for free from this link | |||||||||||||||||||||||||||||||||||||||||||||